Tutorial
Setup 1 Projects
This section teaches you to build your project in just a few steps with Ethna using command line.
Hint
Make sure once the Ethna is installed on your computer, you have made
changes to your php.ini files. i.e. pear libraries are in the include
path. On a Mac, you would do something like the following
$ emacs /etc/php.ini

And then add the appropriate path

; include_path = ".:/Users/YOUR-USER-NAME/pear/share/pear/"
Similarly, make the changes to your php.ini file on other Operating Systems.
Simple Blog Application
Here, we are going to create a simple blog application with Ethna and ethna’s command line tool.
In this tutorial, there are two important learnings
Ethnaflow of creating an application- How to set up a url
1. Application information
Before developing an Application, there are two points to keep in mind.
- Application ID (must be letters) e.g. miniblog
- Application Directory. Usually on Linux, it is
/var/www/. Although, you may change it your directory by modifying the/etc/apache/httpd.configfile.
In this tutorial, we are going to use /var/www/.
To create a new project command ethna add-project AwesomeName
$ cd /var/www
$ ethna add-project miniblog
The above command will create a skeleton for the application. Following is the sample output.
$ ethna add-project miniblog
creating directory (/var/www/miniblog) [y/n]: y
project sub directory created [/var/www/miniblog/app]
project sub directory created [/var/www/miniblog/app/action]

...

file generated [/usr/share/php/Ethna/skel/skel.view_test.php -> /var/www/miniblog/skel/skel.view_test.php]

project skeleton for [miniblog] is successfully generated at [/var/www/miniblog]
Above application has been generated.
Verifying the Directory Structure
Let’s take a peek at the directory and the files generated.
| - App (directory of the application)
| | - Action (Action Script)
| | - plugin (filter script)
| | - test (test scripts)
| `- View (view script)
| - bin ( command line scripts)
| - etc (configuration files, etc.)
| - lib library) (application
| - locale
| `- ja_JP
| - log (log file)
| - schema (DB schema, etc.)
| - - skel (skeleton application file)
| - template
| `- ja_JP (template file)
| - tmp (temp files)
`- www (web publishing file)
Common use is in the following directory.
app/app/actionapp/viewtemplate/ja_JP
2. Setting Application’s Url
Although you may see it on the localhost/miniblog/www. Also, in order to access the application from web browser, i.e. var/www/.
We are going to set the Apache Virtual Host to http://miniblog.myhost/ like the following:
<VirtualHost *:80>
   ServerName miniblog.myhost
   DocumentRoot /var/www/miniblog/www
</VirtualHost>
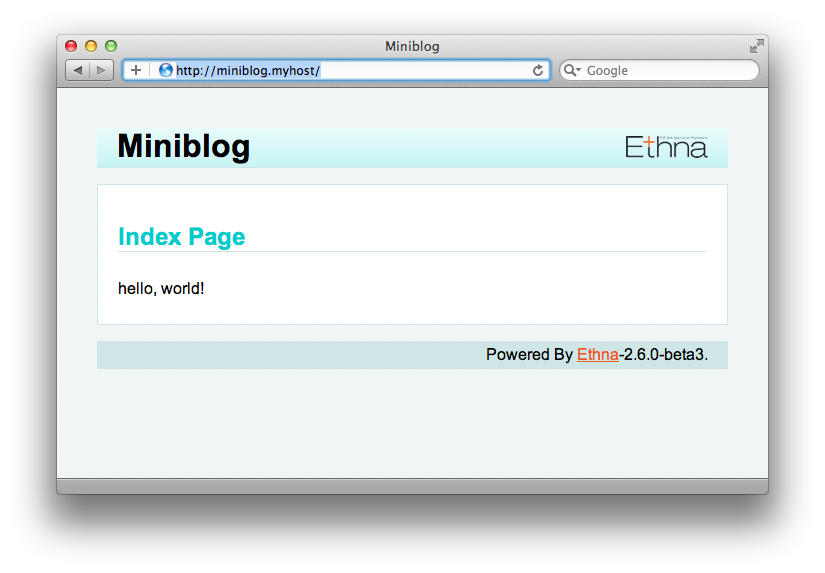
Set up is complete lets try to view in the browser
http://miniblog.myhost/
If the set up is done correctly, you may should be able to see the following output
Next we are create action using ethna
Flow of creation & processing: Action, View, Template
Prior to creating a real application, we are going to add action, view and template to our miniblog.
Create action, view, template
Next we are going to create action hello, which will be accessible from the following url
http://miniblog.myhost/?action_hello=true
There are 3 things to do
add-action helloadd-view helloadd-template hello
Let’s jump to the command line and do the above 3 steps.
$ ethna add-action hello
file generated [/var/www/miniblog/skel/skel.action.php -> /var/www/miniblog/app/action/Hello.php]
action script(s) successfully created [/var/www/miniblog/app/action/Hello.php]

$ ethna add-view hello
file generated [/var/www/miniblog/skel/skel.view.php -> /var/www/miniblog/app/view/Hello.php]
view script(s) successfully created [/var/www/miniblog/app/view/Hello.php]

$ ethna add-template hello
file generated [/var/www/miniblog/skel/skel.template.tpl -> /var/www/miniblog/template/ja_JP/hello.tpl]
template file(s) successfully created [/var/www/miniblog/template/ja_JP/hello.tpl]
Tip
- You can add a view and template in one command by adding
-tlike this add-view -t hello
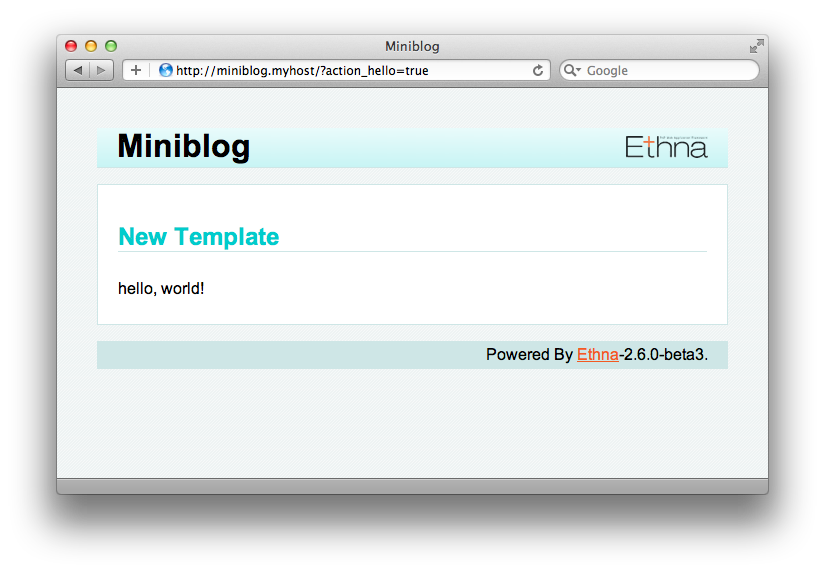
Now, the view for the added action named hello can be viewed in the browser with the following url
http://miniblog.myhost/?action_hello=true
The browser should display the following
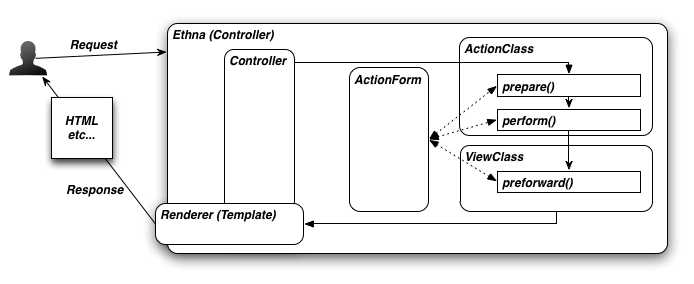
Action
With the command ethna add-action hello, Hello.php is created in the directory
app/action/Hello.php. In this php file there are two classes. As a courtesy, comments
are also generated, but for this tutorial I am omitting the comments. The two classes follows next.
<?php
class Miniblog_Form_Hello extends Miniblog_ActionForm
{
     protected $form = array(
  );
}

class Miniblog_Action_Hello extends Miniblog_ActionClass
{
    public function prepare()
    {
        return null;
    }

    public function perform()
    {
        return 'hello';
    }
}
Miniblog_Form_Hello
This is the action form class, and inherits Ethna’s ActionForm class. In this class the form for POST and/or GET is defined. We will discuss more about forms later in this documentation.
Miniblog_Action_Hello
This class implements the Hello action. Two functions prepare() and perform()
are called before the implementation transit to view.
View
The, view class generated by the command ethna add-view hello, should be in the directory
app/view/Hello.php.
<?php
class Miniblog_View_Hello extends Miniblog_ViewClass
{
    public function preforward()
    {
        $message = "Hello World";
        $this-af->setApp('helloVariable',$message);
    }
}
This is the View class inherits from ethna’s View class. View class is responsible
for setting the variables that then be used in the HTML template. You may set your variables
in the function preforward(), using setApp().
Template
Last one is template which is created by the command ethna add-template hello in the
directory template/ja_JP/hello.tpl
Lets, play with the helloVariable and try to print it in the template
<h2> New Template </h2>
<p> {$app.helloVariable} </p>
Implementation of Application
Lets start the implementation of creating a blog via learning following 3 things
- Add action to handle the post, defined in a form.
- Output the value from the form.
- Validate the values from input form.
Add action
First is to quickly add an action named commit by the command ethna add-action commit
$ ethna add-action commit
file generated [/var/www/miniblog/skel/skel.action.php -> /var/www/miniblog/app/action/Commit.php]
action script(s) successfully created [/var/www/miniblog/app/action/Commit.php]
As the message also shows, there should be a file generated in app/action/Commit.php
Here, there are two classes,
class Miniblog_Form_Commit extends Miniblog_ActionFormthat handles the input fields for the formclass Miniblog_Action_Commit extends Miniblog_ActionClassthat performs actions upon input/submitting the form
Lets take a look at them one by one
Creating Form
And in app/action/Commit.php file.
<?php
class Miniblog_Form_Commit extends Miniblog_ActionForm
{
    protected  $form  =  array(
        'Comment'  =>  array(
            'type'  =>  VAR_TYPE_STRING,
            'form_type'  =>  FORM_TYPE_TEXTAREA,
            'name'  =>  'comment',
            'max'  =>  140,
            'required '  =>  true,
        ),
    );

}
Which is:
- Form named Comments
- The value type is string
- Form type is TEXTAREA
- 140 Characters
- Required Item
And the second class
<?php
class Miniblog_Action_Commit extends Miniblog_ActionClass
{
    public function prepare()
    {
        return null;
    }
    public function perform()
    {
        return 'index';
    }
}
We will talk about this second class Miniblog_ActionClass soon, but first lets create the form to
be shown in the browser.
Display Form
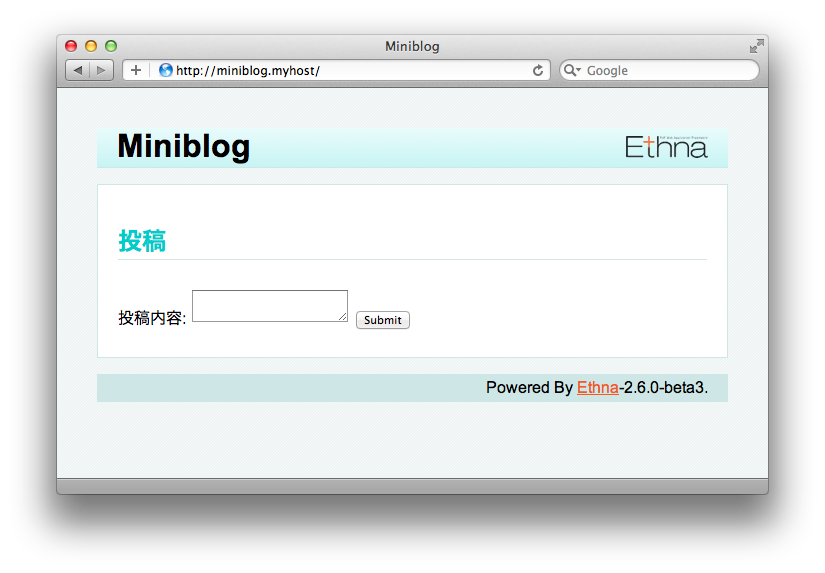
Lets display the form in our template/ja_JP/index.tpl file
<h2>Post</h2>

{form name="form_comment" ethna_action="commit"}
  Post Content:
  {form_input name="comment"}

  {form_submit}
 {/form}
ethna_action defines the action to be called. It is similar to doing action="commit.php" in plain html form.
Similarity other values are self explanatory.
Upon visiting the browser, a page similar to following should appear.
Showing the POST content
<h2>Comment</h2>
{$form.comment}
This way you should be able to see the post content after the submit button from the text area.
$form is used to access the variables defined in the ActionForm class.
Display Validation and Error content of POST
Here we explain about the Miniblog_ActionClass where the validations to the form can be performed.
public function prepare()
{
   if ($this->af->validate() > 0) {
       return 'index';
   }
   return null;
}
Firstly, prepare() is called, here the necessary preparations can be done, like assigning values to instances,
performing checks etc.
$this->af is the action form object, while validate() executes the method that performs validations on the
input value. The point here is that if there is a trouble with the validation, the next method prepare() will not
be called and instead the index will be returned (rendered).
Displaying Errors
Error content for the form are handled by the variable $error.
<h2>Posting Comment</h2>
{if count($errors) > 0}
There was an error !
{/if}

{form name="form_comment" ethna_action="commit"}

 Post Content:<br />
 {message name="comment"}<br />
 {form_input name="comment"}

 {form_submit}

{/form}
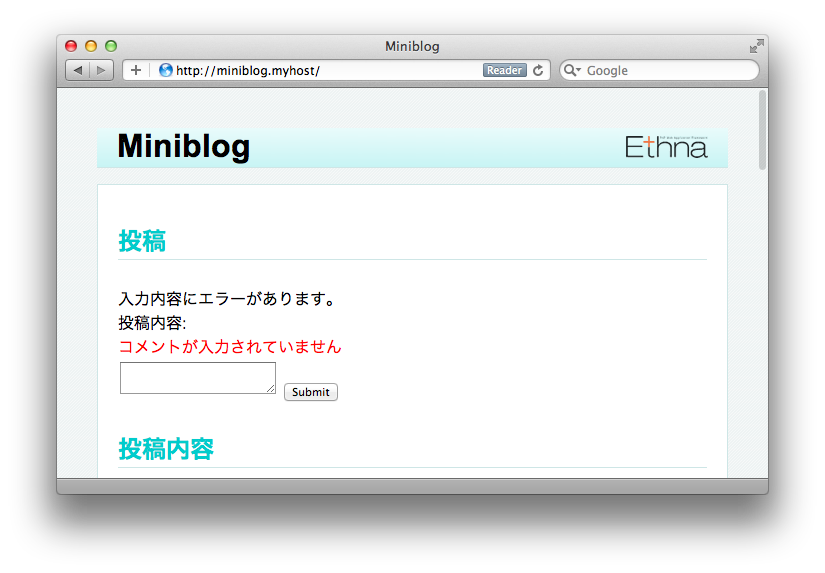
Where the output of the above code would be the following, if the characters in the text area are more than 140 or 0.
Connection to Database
In this section, we talk about the following things
- Setting Database
- SELECT, INSERT, UPDATE i.e. basic stuff
Setting Database
Setting database is pretty straight forward with ethna.
Settings are defined in etc/miniblog-ini.php.
To connect to the database uncomment the dsn like the following.
<?php

$config = array(
   // site
   'url' => '',

   // debug
   // (to enable ethna_info and ethna_unittest, turn this true)
   'debug' => true,

   // db
   // sample-1: single db
   // 'dsn' => 'mysql://user:password@server/database',
   // ...
Replace the
userwith yourDB usernamepasswordwith yourpasswordserverwithlocalhostor127.0.0.1databasewith yourdatabase_name
Save it and good to go
Connecting to Database in Action Class
The following connects to the database in app/action/Hello.php
function perform()
{
    $db = & $this->backend->getDB();
    $db->db->setFetchMode(DB_FETCHMODE_OBJ);
}
SELECT, INSERT, UPDATE with $db
SELECT
$sql = "SELECT * FROM users where id > ?";
$params = array("1");
$stmt = & $db->db->prepare($sql);
$res = & $db->db->execute($stmt,$params);

echo "<pre>";
$i = 0;
while ($data[$i] = $res->fetchRow()) {
   if ($i){
       var_dump($data);
   }
   $i++;
}
echo "</pre>";
INSERT
$sql = "INSERT INTO users (username, email, password, osid, gameid,signup) VALUES (?,?,?,?,?,now())";
$params = array(
     "kevin",
     "dummy@gmail.com",
      sha1("foo"),
      "1111",
      "gamers"
      );
$stmt = & $db->db->prepare($sql);
$res = & $db->db->execute($stmt,$params);

//Note that this message only exists in case of DB error
if (method_exists($res, 'getMessage')){
    var_dump($res->getMessage());
}
UPDATE
$sql = "UPDATE puzzle SET playedby=?,solved=?,score=score +100 WHERE id=?";
$params = array("johny", '1',  "111");
$stmt = & $db->db->prepare($sql);
$stmt = & $db->db->execute($stmt,$params);
Tip
Check the other class methods quickly by var_dump(get_class_methods($res))